No. 1: PRINT OUT AND READ THIS PAGE! Many of your questions are already asked and answered on this page. I keep getting loads of emails from people who want me to answer questions that are already answered here. This is a waste of my time, and I won't do it any more. If I feel that you're asking a question that's already been answered here, you will get a form letter response from me telling you to read this page. I'm not kidding!
No. 2: BE SURE TO REMOVE YOUR SPAM STOPPER! Or provide your correct email address in the body of the message! Some people have asked questions, and I have spent several minutes composing an answer. Then I send it off and it bounces because the email address is incorrect. If you want help, provide your correct email address!
No. 3: Send the part number of the Holley carb! This is the number that follows the letters "LIST" on the airhorn of the carb. I must know what you are working on in order to help you!
No. 4: Send some details about the size of engine, modifications to the engine, size of car, etc.A dragster with a 454 will require vastly different carburetion than a motorhome with a 454! You don't have to get really specific, but some basics are necessary.
No. 5: When sending replies back to me after I've replied to you, retain all previous correspondence in the email, so I can reread it. I get 20 to 30 emails EACH DAY, and I just can't remember the particulars of your situation.
No. 6: Use only Holley parts!If you use a rebuild kit from someone other than Holley, I will not help you! Many problems are CAUSED by poor quality replacement parts. If you are having problems after a rebuild with non-Holley parts, rebuild it again with a Holley kit, following the instructions in the kit. I'm not kidding! Read this from a guy who wrote me in June- July 2000:
June:
"Thanks for the info - you have been helpful. The first
kit I bought - Sierra brand - cost $64 - and didn't solve
the problem. I priced a Holley kit for $40. Don't know
what the difference is yet or why it is $24 cheaper..."
July:
"This is just a follow-up thank you note for you. You can read the
history of our correspondence below but to make a long story short
-
I rebuilt the carb using the Holley parts - and it works beautifully.
Thanks for your help.
Randy R."
No. 7: Do not ask me about specific jetting, power valve, and accelerator pump recommendations for your vehicle! There is no way on this Earth that I can give anyone specific recommendations for jetting, power valves, or accelerator pump settings, because only YOU can drive the vehicle! YOU must determine whether your application needs to be richer or leaner than stock. You should begin from the stock jetting, because it's a good baseline. This page is designed to help you figure out whether to lean or richen certain circuits. If you ask this question, you will be sent a form letter telling you to re-read this page again.
No. 8: Do not use all caps! Please try to use some punctuation, and break up your questions so I can answer them easily. DON'T YOU AGREE THAT THIS IS HARD TO READ WHEN SOMEONE JUST GOES ON AND ON LEAVING THE CAPS BUTTON ON AND NEVER STOPPING THEIR SENTENCE IT JUST RUNS ON AND ON AND IT'S HARD TO READ DON'T YOU AGREE I THINK YOU WOULD AGREE... Enough said.
No. 9: If you pay someone to do work on your carb, or have purchased a brand new carb, ask them your questions. I do this for free, and don't appreciate people who don't seem to mind paying someone for work, but then "cheap out" and expect me to work for free. I like to help those who help themselves, not people with deep pockets who think they can get something for free. I also don't like to second guess someone else's work. They may have done something unusual to your carb, and it wastes my time trying to second guess their mods. This limitation also applies to those of you who buy a brand new carb, which comes with a warranty, and then expect me to do your work for you. A new carb will come with instructions, and a phone number to call if you have problems. USE THEM!
No. 10: Do some diagnosis BEFORE asking me your question. I'm getting really tired of drawing information out of people whose cars aren't running right. I keep getting the feeling that everyone wants me to reach through the computer and fix their cars, without their having to do anything. At the MINIMUM, let me know if your spark plugs are clean and dry, or black and sooty. If they are clean and dry, you may have a vacuum leak. If they are black and sooty, you have too much fuel, caused by incorrect fuel level (too much fuel pressure, bad needle/seat, bad float) or a blown power valve (try a new one).
No. 11: This is a free service. If you folks out there keep sending me emails that I can't decipher because you're not following these rules, I'm going to have to quit answering your questions, because of the time involved with doing this. I really enjoy helping people out, but I refuse to extract required information from you.
Having trouble tuning your 4 barrel Holley? This guide can help! If you know enough to be dangerous when tuning your carb, but not enough to get it right, you need to read this! You will need to know the basics about how to work on your Holley, and a book or two will really help a bunch, because of the pictures and part numbers in them. This guide goes farther than the commercially available books in that it helps you determine when your carb is rich and when it is lean.
No more guessing!
The special hardware you need to diagnose your carb's performance can be purchased for under $50! This amount may be all you have to spend, depending on what tools and instruments you have in your garage right now. Some of the instrumentation can be borrowed from a friend. This guide outlines exactly what you'll need and lists part numbers for those pieces that are not normal in a well-equipped garage.
Author's Background
I started working on cars before I could legally drive, and rebuilt my first V-8 (a Chevy 283) at age 14, at Pop's Chevron service station. Pop started me off rebuilding Ford Autolite carburetors, one of the simplest fuel mixers ever made. I was the Valedictorian of my high school, graduated from automotive school, and graduated from the most prestigious public engineering school in the nation, Cal Poly, San Luis Obispo, where I received a Bachelor's degree in Mechanical Engineering Technology. After college, I worked in aerospace, eventually becoming a real, live rocket scientist at Vandenberg Air Force Base. After tiring of that, I became an inventor and United States patentholder, and am currently making a living off my wits and skills as an inventor and entrepreneur.
Lots of folks have been emailing me with some common problems, so here are some tips for fixing these common problems.
Gas is flowing out of places it shouldn't.
This is most likely due to a bad float valve, bad float, or excessive fuel pressure. The first step is to check the fuel pressure, which should be between 5 psi and 7 psi. If the fuel pressure is correct, either the float has sunk, or there is a problem with a float valve. If you have black nitrophyl plastic floats on a carb over 5 years old, the float may be soaking up gas and sinking. Also, if the carb is near, or over, 5 years old, the float valves (inlet needle and seat assemblies) may need replacing. Float valves have viton rubber tips (most cases) and rubber o-rings that can go bad, especially when they sit around for long periods, as on an old car that hasn't been driven, or a boat stored for the winter. I suggest you purchase a Holley rebuild kit and rebuild the entire carb, because the cost of two float valves is almost as much as the cost of the entire rebuild kit.
Carburetors are really just dumb fuel and air mixers. Any source of airflow through a carb will draw fuel. This is why a carb for a 460 c.i. engine will also work on a 260 c.i. engine. The performance may not be optimum due to signal strength or restrictions, but if the jetting is close for one, it will be close for the other. 2 examples: I took the 600 cfm carb off my 390 truck and put it on my 4 cylinder Pinto. The jetting was right on! My Pop took the 390 cfm Holley off my Pinto and put it on his 390 powered 62 Thunderbird. The mixture was right on. This is why it is important to know what jets your carb came with, and to start out with those jets.
The factory determines jet sizes using several factors on each carburetor, including the air bleed size, the venturi size, booster venturi size and shape, and the power valve channel restrictions. Street carbs and performance carbs of the same cfm rating will be jetted differently, too, so you can't always use the jet rating for different models of the same cfm. Even upgraded models of the same carb will have different jet sizes. So if you find that your car will not run properly with a jet that is within 5 sizes one way or the other of the factory recommendation, you have problems somewhere else, like a bad or misadjusted float, bad needle and seat, a vacuum leak, a dirty carburetor, or a plain old worn-out carburetor.
My first recommendation is to BUY A BOOK OR TWO ON HOLLEY CARBS, or YOUR PARTICULAR BRAND! You are going to need at least one for the photos and part numbers. I own at least 9 different books on Holley carbs, several general repair manuals that cover the Holley, and have cut out many articles from Car Craft, Hot Rod, and other magazines.
We now have an association with Amazon.com, and have selected a few Holley books for you to choose from. Click here to check out the books and videos:
Here's an important word of advice:
Do NOT buy cheap rebuild kits for your Holley carb! All the cheap stuff is junk, especially the needle and seat assemblies, and you will not save any money in the long run! Some of these off-brand kits actually cost MORE than the Holley brand kits!
One thing you CAN do to save money when buying Holley rebuild kits is to buy a kit from a SIMILAR carb in the Holley line. Example: I run a really obscure 0-8007 390 cfm 4 barrel on my Pinto. The kits for this carb are expensive because Holley doesn't sell very many. BUT, most (if not all) of the parts in the 8007 kit are identical to those in a number 1850 Holley kit, the very common 600 cfm 4 barrel. That kit is the cheapest. The same goes for the 428 CJ carb on my Fairlane. The specific kit for it is exhorbitantly priced, but all the parts are the same as the venerable 3310. The things you really need to watch for are the type of accelerator pump passage used, and the baseplate to body gasket, which varies according to cfm rating. Always make sure you get the proper replacement by matching the new one to the old one. Sometimes, Holley will give you the WRONG BASEPLATE GASKET in a kit. This happened to me once on an 850 double pumper.
When buying kits, check into the price of the Trick Kit. It has all the parts of a Rebuild Kit, and comes with a selection of pump cams, squirters, and other useful stuff that the Rebuild Kits don't have. The price for the Trick Kit is usually not that much more than the Rebuild Kit.
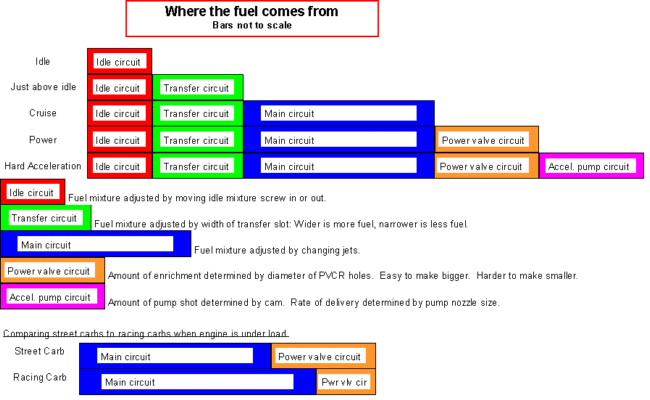
Carb Theory
There are several circuits in your carburetor. Each circuit flows at different times, and some circuits flow when you think they don't.
Floats:
Most floats on Holleys are externally adjustable, except the Quadrajet replacement carbs, series 4175. The standard Holley has a sight hole on the passenger side. In order to set the floats on a Holley with externally adjustable floats, remove the sight plug with the engine off. Start the engine. If the gas just pours out all over the place, shut the engine off right away before you start a fire. Your floats are obviously too high. The way to set standard Holley floats is to unlock the screw with a large flat tip screwdriver, then move the 5/8 hex nut clockwise (CW) to lower float level, or counter-clockwise (CCW) to raise the float level. You're actually moving the whole float valve assembly up and down in the float bowl.
The proper level of fuel is for the fuel to just touch the bottom of the sight hole without running out. Clear sight plugs are available, but I can no longer recommend using them, as they have a tendency to break off right at the o-ring.
If the fuel does not just trickle out of the sight hole when you rock the car back and forth lightly, adjust the float up until it does. If you have a problem with gas just rushing out all over the place, or if you have a carb that drips fuel from the booster venturis at idle or when the engine is off, then you likely have a bad needle and seat assembly. These are removable from the top without having to remove the float bowl, a very fine feature of the Holley.
You'll hear this often from me: Do NOT use float valves from anyone but Holley, or maybe the Carb Shop, Barry Grant, or some other reputable racing supplier. The float valves that come in non-Holley rebuild kits available at auto parts stores are JUNK!!!!!! They often require you to discard the Holley nut and lockscrew, and they often have strange adustment procedures. DO NOT USE THESE!
Do not move the secondary float bowl to the primary and vice versa. The rear float bowl level is lower than the front to keep fuel from pouring out into the carb throat under heavy braking. If you have a car that accelerates well, Holley offers vent whistles and jet extensions that solve the problems that occur during heavy acceleration and braking.
Idle:
The idle circuit supplies fuel when the throttle plates are open only slightly. Mixture screws let you adjust the mixture of this circuit. On a Holley, the fuel comes out a little hole below the throttle plates in the baseplate. There is an idle circuit in the rear barrels of your Holley, too. Most are not adjustable, but Holley put it there to keep the fuel flowing through the rear bowls so it doesn't get stale just sitting there. This is why you can't turn off the fuel flow to the secondaries. Doing so will mess up the metering system by causing a lean condition.
Idle circuit metering is accomplished by three things: Idle feed restrictions, idle air bleeds, and the idle mixture screws. Sometimes you can see the idle feed restrictors in the metering block. In some cases, they are installed in the bottom of the emulsion tubes, and require surgery to remove. This is not recommended, except for experts.
Transition:
The transition circuit supplies fuel between the idle and the main metering system. This is a small slot above the closed throttle plate in the baseplate. The amount of fuel is determined by the idle feed restrictions.
You can put restrictors in the body of the carb to limit the flow of fuel through the transition circuit after the idle feed restrictions. I made a pair from two 10-32 Allen head setscrews with a properly sized hole drilled in the center. I then drilled and tapped the proper passage in the carb, and inserted the restrictors. Now, I have an adjustable transition circuit that I can lean out. Richening the transfer circuit will require enlarging the idle feed restrictors.
When the idle and transition circuits work:
Depending upon the size of your engine and the rpm's it is running at, you can have flow from the idle and transition circuits well into the higher rpms. This is due to the restriction of the venturis. If you have a too-small carb, even at wide open throttle, you will have manifold vacuum. Manifold vacuum is what pulls fuel from the lower parts of the carb, where the idle feed and transition slots are. In the lower parts of cruise, your idle and transition slots will be providing a small amount of fuel. Any time you see manifold vacuum, the idle feed and transition slots will be flowing fuel, because of the vacuum under the throttle plates.
Main Metering:
The booster venturi (that thing sticking out into the throat of the carb) supplies the major portion of the fuel at cruise and power levels. Metering is accomplished by the main jets and air bleeds, and enrichment comes from the power valve.
Accelerator Pump:
Supplies fuel under pressure to compensate for losses in fuel flow when the airflow signal to the booster venturis diminishes when you punch it from a standstill, or when the airflow goes away during changes in engine load.
In Holleys, there are two pump check valves:
The inlet check is above the pump diaphragm, and may consist of a steel check ball held in by a bail, or a rubber umbrella valve. The better of the two is the rubber umbrella valve, since it is normally closed and provides a quicker shot, because it doesn't need to seat itself like the ball does. Just be careful not to put these rubber valves into harsh cleaning chemicals, as some rebuild kits don't come with a new valve.
The outlet check on most Holleys is below the squirter. It consists of either a small ball held down by a steel cylinder, or a sharpened steel cylinder. Either is ok, but a small ball by itself is not enough weight to prevent siphoning by the airflow going through the carb throat. I've seen this on my own carbs, when I didn't realize there was a heavier weight to go on top of the small ball.
Spread bore carbs do not use an outlet check under the nozzle, but rather have one in the metering block. In order to prevent fuel from being siphoned from the passage between the metering block and outlet, they use a special anti-pullover nozzle, which prevents airflow from coming close to the outlet and sucking the fuel out.
Power System:
Activated by the power valve in a Holley, this circuit supplies extra fuel to richen up the main metering system. This is a vacuum signalled valve that simply opens and closes at a preset amount of manifold vacuum. The rating is stamped on the valve: 2.5 up to 10.5 inches of mercury manifold vacuum. The lower the number, the later the valve opens, the higher the number, the earlier the valve opens. The metering for this system is provided by the two little holes underneath the power valve, called "PVCR's" or Power Valve Channel Restrictions.
Replacing the power valve with a plug:
If I could, I'd put a electrical shock device in your mouse right now to deter you from even thinking about doing this on just about any application. Think of the power valve as a switch that richens your mixture for heavy loads and accleration. If you decide to plug that power valve, you will need to increase the size of your main jets for proper full power mixture to the point that your cruise mixture will be so rich that your engine will actually foul spark plugs. Too much gas is just as bad as not enough gas. The engine will be sluggish at low rpms, and just won't run right. If you have problems with power valves blowing out, fix the problem, or install one of the available power valve protectors. Summit sells one for about $8. All 4010 and 4011 Holleys, and many newer 4150 and 4160 series carbs come from the factory with this power valve blowout protector.
Power enrichment on other carbs:
The power system on Carter/Edelbrock 4-barrel carburetors and Rochester Quadrajets is accomplished using tapered metering rods that run inside the main jets. The rods are held down by high manifold vacuum, which makes the fuel opening in the main jet small. As manifold vacuum drops under power, a spring under the metering rod holder raises the rod out of the main jet. Since the rod is tapered, as it moves out of the main jet, the fuel opening gets bigger, resulting in a richer mixture. This system is very effective and easy to tune, since the rod tapers can be changed and different springs installed for varied rates of movement. And just for the record, I don't agree with Holley's new advertising about the drawbacks of metering rods. There really are none. I wish Holley would use them instead of power valves, because metering rods supply a gradual increase in richness, rather than a sudden one, like what happens when a power valve opens all at once. And, metering rods don't blow out like power valves do occasionally.
Double Pumpers and Gas Mileage (or lack thereof...)
Have you heard people complain about the gas mileage they get with performance-type double pumper carbs? There is a reason that the 0-4776 through 0-4781 double pumpers get bad gas mileage. It's the jets! Surprised? Holley sizes the jets and air bleeds on these carbs so that they run on the rich side at cruise speeds. They make more power this way, at the detriment of gas mileage. These are competition carbs, and they are supposed to work this way. Why don't we just put leaner jets in them to get mileage? Because the PVCR's are small, and under power conditions, the carb will supply an overall lean condition. What you can do is lean the jets out, then enlarge the PVCR's to compensate for power situations.
The way to do this scientifically is to measure the diameters of the openings of stock jets and PVCR's using drill bit diameters. Then calculate the total area of all the openings, and add them up.
A = 3.1415 x dia x dia / 4
Decrease the main jets for proper cruise mixture, and enlarge the PVCR's until you get back to the original area of all the openings. This way, your cruise mixture will give you good gas mileage, and under power, the engine will have proper mixture.
Graphical interpretation of these systems:
These bar graphs (not to scale) illustrate the fuel flowing through your Holley at different stages. Knowing what circuit is flowing at what time is very important to your tuning ability.
Vacuum secondaries allow a person to run a carb that most people believe might be too big for a particular engine. By playing with various secondary springs, you can tailor the secondary opening point and rate of your carb, and can even make them to where they don't open all the way. This allows you to use a carb that might be too big for your application. The diaphragm housing with the removable top is highly recommended. Trying to align the screw holes while keeping the spring compressed is a quick way to pinch off and tear the diaphragm. One or two torn diaphragms is enough to pay for the quick change kit. I know this from experience.
On some Holley's, there is a steel check ball in the passage that actuates the diaphragm. Leave it there. If you take it out, the secondaries are likely to flop open very quickly and give you a bog.
If your vehicle is heavy, like a motorhome or 4x4, you should always use vacuum secondaries, because you need to be able to keep the secondaries closed during cruise. Since these vehicles are so heavy and often use high rpm rearend gears, your carburetor opening is often so large that many double pumpers will open the secondaries during cruise, causing horrible gas mileage. With vacuum secondaries, you can change the secondary spring to keep the secondaries closed for better gas mileage, yet still have them open during passing and hillclimbing.
A tip about vacuum secondary diaphragms
Holley makes about 4 different diaphragms. Even though one may look just like another, the link length can vary. This makes your secondary opening rate all messed up, because the spring is not acting on the diaphragm correctly. If your link is too long, the secondaries won't open all the way, no matter what spring you have installed. If your link is too short, the spring may not even touch the top of the diaphragm, which is not good.
How to know if your vacuum secondaries are opening
You can tell if your secondaries are opening by keeping them shut with a spring or other means. Test drive the vehicle. If performance is worse with the secondaries held shut, then they were opening when operating normally. Winging the engine in neutral does not work! Vacuum secondaries operate off engine rpm and load, not just rpm, and there just isn't enough airflow in a no-load situation to open the vacuum secondaries.
Now that you've got the basics down, here is how you tell what circuit needs to be richer or leaner. You put an instrument in the exhaust flow that tells you graphically whether the engine is lean or rich. You then put a vacuum gauge on the engine to tell you what circuit is working at the particular time that you are lean or rich.
Simple!
The first instrument is known as an O2 (oxygen) sensor. These sensors are used in electronically fuel injected cars as a signal telling the computer whether to supply more or less fuel. O2 sensors create their own electricity in the presence of heat and oxygen. You simply put the sensor in a hot spot in your exhaust flow, then read the electrical output.
There are a couple of ways to put O2 sensors in your exhaust: The trick way, and the cheap way.
The Trick Way
Buy an air/fuel ratio monitor from Edelbrock or K&N. Summit (1-800-230-3030) sells the Edelbrock system for about $130. This comes with an O2 sensor, weld-on bung, and a display panel with yellow, green, and red LED lights representing lean, good, and rich mixtures.
Racer Wholesale (1-800-886-7223) sells several different air/fuel ratio monitors. One has two channels for dual exhausts, and another has rich/lean and injector duty cycle for you FI guys.
The Cheap Way
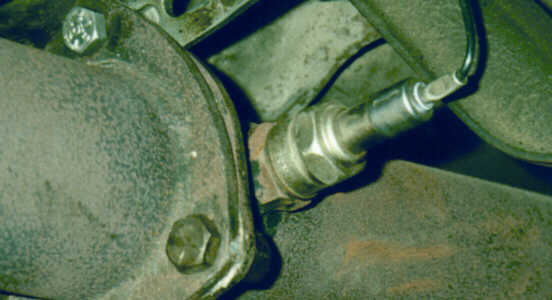
Buy a single wire O2 sensor at your local parts house, make your own bung, and read the voltage with a digital voltmeter. The sensor that I bought is a Standard brand, number SG-12. The threads on this sensor are the same as a small-block Chevy gasket-style spark plug, so the bung can be made from one of those spark plug anti-foul adapters. Other O2 sensors use the large diameter threads of 18mm big Ford spark plugs. Just cut and fishmouth the adapter so that the sensor sticks into the exhaust flow. You need to put the sensor as close as possible to the engine so it gets hot and stays hot. Just make sure you route the wire so it doesn't get burned by the hot exhaust pipe. Weld the bung to the pipe, then drill and file the hole to clear the sensor.
Since the purpose of this sensor is just a guide to help you tune your carb, not run a fuel injection computer, if you can't get the sensor really close to the engine, don't worry, because it will still work for your purpose. All that will happen is that your reading may go away during periods of idling. On the same subject, don't worry about using a heated sensor, as the expense and complications involved are not worth it for carburetor tuning. Remember, your eyes are using this data, and if it stops for a while, no harm is done!
Sensor installed in Pinto exhaust.
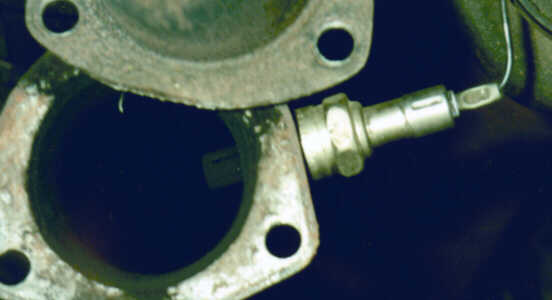
Sensor and welded bung:
Once you have the sensor installed and wiring run up to the inside of the car, attach a digital voltmeter (you really should have one of your own, but you can sometimes borrow these from friends if you don't have one) to the sensor and a good body ground. The sensor is positive. The readings you'll get once the sensor has heated up will be from 1.1 volts (1100 millivolts, or mv) down to about 100 mv. The high readings are rich, the low readings are lean. The perfect mixture for cruise is 400 mv. I have found my car to run well at about 700-800 mv. Once it gets below that, it tends to get into a lean misfire. Your results may vary.
Here is a general idea at what the O2 sensor voltage output looks like. As you can see, the slope around 400mv, which is 14.7:1, or perfect combustion, is very steep. This is why only computerized fuel injection systems can really hold anything close to 400mv. If you're wondering about how a sensor can read oxygen content in rich mixtures where there is no extra oxygen, the sensor begins to act as a temperature sensor above 400mv.

Vacuum gauges
You will need a gauge to read the manifold vacuum on your engine. The more accurate the gauge, the better your results will be. The manifold vacuum is measured at the base of the carb or on the intake manifold somewhere. Don't tap into just one runner, though, as sometimes this will give funny readings. You need to check the signal that sees all the cylinders. Most Holleys have a manifold vacuum port in the front on the passenger side under the primary float bowl.
Road Tuning
Start by taking your carb apart and writing down the sizes of the jets, the actuation point of the power valve, and the size of the accelerator pump squirter. Put it all back together, check for leaks, then drive it until the engine is warm. In order to get good readings, you will need to drive at a constant speed of 45-55 mph, accelerate lightly, and accelerate heavily.
Idle
The best way to set the idle mixture is to lean the carb out until the vacuum just starts to drop, then richen the mixture by about 1/4 turn. If you have a bit of a stumble in very light, low speed operation, sometimes it helps to richen it up by another 1/4 turn.
If your idle mixture screws do not respond to adjustments, you may have several different problems. The most common is using the wrong carburetor for the application. Smog carbs with reverse mixture screws (these are the ones with the little decals, telling you to turn the screws in for richer mixtures) only have a small band of adjustment built in. Smog carbs work well on stock engines only, and you can't expect them to work well on a modified engine, especially one with a lopey cam.
Another common cause of non-responsive idle mixture screws is having too much (more than .040 inch) of the idle transfer circuit exposed. The idle circuit allows a very small amount of finely metered fuel into the engine. By exposing the transfer circuit too much, the gross feed of fuel coming out of the transfer circuit overpowers the fine amount coming out of the idle ports. This is akin to adding a squirt gun's flow into a garden hose's flow...the fine amount of the squirt gun is so insignificant compared to the garden hose, that there is no way that adjusting the flow of the squirt gun will make any difference. There are several ways to fix this problem:
1. If your engine is worn, or has a big vacuum leak, you should fix those problems before trying to crutch your carb. Sometimes, with worn engines or one with a vacuum leak, the carb must be opened quite a bit just to get the engine to run.
2. Buy the right sized carb! If you're trying to use a 600 cfm carb on a lopey-cammed 460, then you must open the primaries too far into the transfer slots just to get enough air into the engine to get it to idle. A larger carb on this example would have a larger throttle plate, which would need to opened less to allow the engine to idle.
3. Open the secondaries a bit, and close the primaries a like amount. This will allow more air in, without exposing quite so much of either primary or secondary transfer slots.
4. If opening the secondaries doesn't work, then you may have to drill small holes (1 per plate) in the primary throttle plates to allow air in while the plates cover the transfer slots. Start small, about 1/16 inch, on the throttle plate next to the ports. This is a trial and error procedure, so start small. You should not have to go much larger than 3/16 inch. Drill on the side opposite of the transfer slots, to help keep this added airflow away from the idle ports and transfer slots.
Main Jetting
Going down a flat road at a rate of about 45 mph or higher will give you a good indication of your main jet sizing. Shoot for between 400 mv to about 700 mv. Since carburetors are not as exact as computer controlled electronic fuel injection, keeping at the perfect 400 mv will be tough. You always want to go a bit rich, as excessively lean mixtures will cause damage to your engine, create pollution, and give you bad gas mileage and performance.
You can do this without a meter, but it's a bit tougher. Start with the factory jetting and proper float levels. Drive it around for a while, noting if the engine surges at highway speeds. Take a look at the plugs. If they are sooty, you may need to lean out the main jets. If the plugs are white, you may need to richen the main jetting. Start stepping the jets up or down, one step at a time, and drive the car around for a day or two. Do not make large changes on your jetting. You can't just throw any jets in there because you think it needs to go one way or the other. It takes time to get it right, and you must change jets one number at a time.
Power Valve
Once you have the main jets set, it is time to play with power valves. Going up a slight incline at highway speeds, or accelerating slowly at highway speeds, you will notice the vacuum reading falling. As it falls, it will come to the opening point of your power valve. You can tell when the power valve opens because the meter will go lean for a while, then the valve opens, and the meter begins to show rich. You'll probably notice the power increase right when the power valve opens. I can tell exactly which power valve I have in my car by the vacuum reading when the lean misfire goes away under light loads. About 700 mv to 900 mv is a good reading for light loads with the power valve open.
If your PVCR's are too small, the meter won't go up high enough, and power will suffer because the engine is still too lean. You can drill out the PVCR's with a small drill bit in a fingertip drill bit holder. If the PVCR's are too big, you will see a big jump in the meter readings, and maybe a puff of black smoke. My Pinto's PVCR's were way too big, so I found a kit to let you install little Mikuni pilot jets into the metering block of your Holley to make the PVCR's smaller. The company went out of business after the owner passed away, so if anyone knows of someone still selling this kit, let me know!
Now that you have the power valve mixture correct, try some different power valves. I like a 10.5 in my Pinto, because it pulls about 14 inches of Mercury going down the road, and the 10.5 comes in pretty quickly when going up slight inclines.
Tip: Use a power valve that is about 2 inches of mercury below the LOWEST manifold vacuum reading you get on cruise and idle (in gear for automatics). If the power valve flutters open at idle, it can act as a pump, and push extra fuel into the main well, causing a drip from the booster venturis. If the power valve opens a lot while you're driving down the road, your gas mileage will suffer.
Blown Power Valve
You may notice a bad power valve because you will not see the jump from lean to rich when your vacuum gauge gets to the power valve setting. You will see a rich mixture at cruise, when the power valve should be closed. You may also notice a badly BLOWN power valve as an overly rich condition at idle. This occurs only if the diaphragm has a big hole in it that lets fuel from the float bowl into the power valve vacuum passage and into the engine.
There are some hand held vacuum pumps and adapters out there to check power valves. I just use my mouth after making sure all the gas is dried off. If you suck a lot of air through the diaphragm, or it won't hold a vacuum, then replace it.
Accelerator Pump
You'll probably need the help of a spotter on this, because things happen fast when you punch the throttle from a dead stop. If your meter goes rich right away when you punch the throttle, then it leans out gradually, you need a smaller pump nozzle to make the fuel come out slower. If the meter doesn't go rich right away, but gets richer later, you may need more fuel earlier. A bigger nozzle is in order. Try some different cams, too, but be aware that bigger is not always better. If your car still has a lean stumble with the biggest cams and the biggest nozzles, you may have to go with the 50cc "Reo" pump diaphragm and the corresponding cam. You must use the big black cam on 50cc pumps to get the full shot of the 50cc pump! If you put that big old pump under there but don't move the lever any farther than before, what's the use?
Also, don't put the 50cc cam on small pump diaphragms! You'll break them! Most manifolds will require a 1/4 inch spacer under the carb to run the big pumps. So if you add a spacer, don't forget to check your hood clearance BEFORE you slam the hood!
Another thing to think about when you start getting into the big pump cams and nozzles is to use the hollow nozzle hold down screw. This is due to the fact that the little passage cut in the side of the internal threads may not be big enough when you're way up in shot size, over .040, as recommended by Holley.
Accelerator Pump arm adjustment: The accelerator pump arm must not be loose at idle. The .015 clearance is measured at wide open throttle (engine off!). This is to prevent damage to the pump arm and diaphragm. You may need to adjust the external spring one way or the other to get it tight at idle, yet still have the .015 clearance at WOT.
Well, I sure hope this helps you out! The best advice I can give is to get books and READ THEM! The guys who publish the carb tuning books are experts who get paid to do this kind of work. Don't be afraid to try different jets, accelerator pump cams and nozzles, and power valves in your carb. You have the instrumentation to figure out what you did wrong if it doesn't work the way you expected it to, so there is no harm done. Don't drill or file stuff unless you know exactly what you are doing, and you are prepared to buy new parts if you screw up your old ones.
Return to main page and check out the tool that I invented!
Questions? Comments?
Okay, folks...lots of you aren't following the rules below...especially the part about quoting your old emails...please read and follow these rules!
No. 1: PRINT OUT AND READ THIS PAGE! Many of your questions are already asked and answered on this page. I keep getting loads of emails from people who want me to answer questions that are already answered here. This is a waste of my time, and I won't do it any more. If I feel that you're asking a question that's already been answered here, you will get a form letter response from me telling you to read this page. I'm not kidding!
No. 2: BE SURE TO REMOVE YOUR SPAM STOPPER! Or provide your correct email address in the body of the message! Some people have asked questions, and I have spent several minutes composing an answer. Then I send it off and it bounces because the email address is incorrect. If you want help, provide your correct email address!
No. 3: Send the part number of the Holley carb! This is the number that follows the letters "LIST" on the airhorn of the carb. I must know what you are working on in order to help you!
No. 4: Send some details about the size of engine, modifications to the engine, size of car, etc.A dragster with a 454 will require vastly different carburetion than a motorhome with a 454! You don't have to get really specific, but some basics are necessary.
No. 5: When sending replies back to me after I've replied to you, retain all previous correspondence in the email, so I can reread it. I get 20 to 30 emails EACH DAY, and I just can't remember the particulars of your situation.
No. 6: Use only Holley parts!If you use a rebuild kit from someone other than Holley, I will not help you! Many problems are CAUSED by poor quality replacement parts. If you are having problems after a rebuild with non-Holley parts, rebuild it again with a Holley kit, following the instructions in the kit.
No. 7: Do not ask me about specific jetting, power valve, and accelerator pump recommendations for your vehicle! There is no way on this Earth that I can give anyone specific recommendations for jetting, power valves, or accelerator pump settings, because only YOU can drive the vehicle! YOU must determine whether your application needs to be richer or leaner than stock. You should begin from the stock jetting, because it's a good baseline. This page is designed to help you figure out whether to lean or richen certain circuits. If you ask this question, you will be sent a form letter telling you to re-read this page again.
No. 8: Do not use all caps! Please try to use some punctuation, and break up your questions so I can answer them easily. DON'T YOU AGREE THAT THIS IS HARD TO READ WHEN SOMEONE JUST GOES ON AND ON LEAVING THE CAPS BUTTON ON AND NEVER STOPPING THEIR SENTENCE IT JUST RUNS ON AND ON AND IT'S HARD TO READ DON'T YOU AGREE I THINK YOU WOULD AGREE... Enough said.
No. 9: If you pay someone to do work on your carb, or have purchased a brand new carb, ask them your questions. I do this for free, and don't appreciate people who don't seem to mind paying someone for work, but then "cheap out" and expect me to work for free. I like to help those who help themselves, not people with deep pockets who think they can get something for free. I also don't like to second guess someone else's work. They may have done something unusual to your carb, and it wastes my time trying to second-guess their mods. This limitation also applies to those of you who buy a brand new carb, which comes with a warranty, and then expect me to do your work for you. A new carb will come with instructions, and a phone number to call if you have problems. USE THEM!
No. 10: Do some diagnosis BEFORE asking me your question. I'm getting really tired of drawing information out of people whose cars aren't running right. I keep getting the feeling that everyone wants me to reach through the computer and fix their cars, without their having to do anything. At the MINIMUM, let me know if your spark plugs are clean and dry, or black and sooty. If they are clean and dry, you may have a vacuum leak. If they are black and sooty, you have too much fuel, caused by incorrect fuel level (too much fuel pressure, bad needle/seat, bad float) or a blown power valve (try a new one).
No. 11: This is a free service. If you folks out there keep sending me emails that I can't decipher because you're not following these rules, I'm going to have to quit answering your questions, because of the time involved with doing this. I really enjoy helping people out, but I refuse to extract required information from you.
Contact the author at:
This is a part-time endeavor for me, so if I don't get back to you
right away, please don't get upset. I'll do my best to answer your questions,
and if I don't have an answer for you, I will tell you so. You will get
an answer if you provide your correct address.
Holley Book Source
Please visit our Amazon.com Associate store for selected Holley, Rochester, Carter, and other carburetor books. Amazon.com has some really great prices, too!
Want to add a link to this page? Let me know, and we can swap. Here is a small gif to use as a banner, if you wish. I will add sites that are auto related, and which do not have material that may be deemed objectionable. Your link will be included on my main page, as I don't want this one to get bogged down with banners.
![]()
This page (and all of the others on this website, for that matter) is sponsored by my company, Plastic Oil Products, which makes this useful little tool for draining all your oil from the oil bottles you use to fill your engine. Get ALL the oil you paid for with BOB!

Back to www.bob2000.com