Jump to first occurrence of: [XP] [BOOT]
If you have been living with Windows XP
since the OS launched a couple of years ago, then you've already felt
the pain of a reinstall. Since the arrival of the XP Service Pack (SP1)
last year, reinstalling the OS has become a two-part process of
installing the original XP disc and then downloading and installing the
SP1. There is an analgesic for your reinstallation pain, however; it's
called slipstreaming. Developed as a way to streamline network
installations of WinXP, slipstreaming lets you apply the SP1 (now SP1a)
update to the original XP OS files before you do a reinstallation,
saving you from a long and tortuous extra step.
Slipstreaming requires that you make a bootable CD with the updated XP
system files, so you will need a CD-R\RW drive and good burning
software. Note that by the time you read this, Microsoft may have
released Service Pack 2 for WinXP. Users of the beta report that you
can use the slipstreaming method outlined below with SP2, as well.
Also, this technique works on both WinXP Home and Professional. The
same SP1 update can be applied to both installations.
|
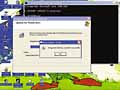
The slipstream function in SP1 lets you integrate the SP1 revisions into Windows XP's original installation files.
|
 Preliminary Preparations Preliminary Preparations
You'll need to create three new folders: one to hold the compressed SP1
files (such as C:\SP1down), one to hold the extracted SP1 files
(C:\SP1), and one to hold the XP system files (C:\XPdisc). Because of
the extracted and temporary files required for CD burning operations in
this project, count on needing several gigabytes of free hard drive
space.
The slipstream function is only available in the network version of the XP Service Pack, so you need to go to www.microsoft.com/windowsxp/pro/
downloads/servicepacks/sp1/network.asp
for the link to the English language, network version of SP1a, which
you should click and direct to download into the new SP1down folder you
made. It takes up about 125MB.
Now we need to copy the full
contents of your original WinXP disc to its temporary folder. Insert
the WinXP disc and exit from any Welcome screen that runs
automatically, then right-click the CD drive in My Computer and click
Explore to open its contents. Simply highlight and click and drag the
entire contents of the root directory of the CD to the XPdisc folder on
your hard drive.
The next step is to extract the SP1a files. Click Start, Run and type command
in the Open text box. Navigate to the subdirectory holding the
compressed SP1a pack by typing the old change directory command: cd\c:\sp1down . Type dir at the command prompt so you can see the actual name of the compressed file. In our case it was Xpsp1a_en_
x86.exe. At the command prompt, type file name –x, which will prompt you for a target folder. Either type in your target (c:\sp1 ) or use the Browse button to navigate there and then click OK to extract the files.
Still using the command line interface, change to the /update subfolder in the target SP1 folder by typing cd\sp1\update . In order to slipstream the service pack into the WinXP files, type update /s: path to XP disc folder (where the italicized text is the directory containing the files we copied from the original XP installation disc, such as update /s:c:\
xpdisc ).
You should now see a new Service Pack 1 Setup Wizard window that will
show you the progress of the SP1 files integrating with the OS. When
this is complete, you can close the command prompt window.
Boot It Up
At this point, you could simply insert a blank CD-R and drag the files
from your XPdisc folder to the drive to make a nonbootable Windows
installation. You would need to boot with a floppy (with CD-ROM drivers
enabled) and type setup at the command line of the CD drive to start the installation.
But if you want an even more streamlined process, make the slipstreamed
CD bootable. To do this, get the handy freeware program (donations
accepted) IsoBuster at www.smart-projects.net/isobuster .
This program lets you copy the boot image from a disc. Install the
program and then reinsert your original Windows XP installation disc.
Start IsoBuster and direct the program to view the CD drive with your
original WinXP disc. In the left pane of IsoBuster, highlight the
Bootable CD label in the directory tree and then right-click Microsoft
Corporation.img in the right pane. This is your boot image. Use the
Extract command and direct the dialog box to save the boot image to
your XPdisc folder.
Now to burn it all. We used Ahead Nero,
but make sure you have a recent version. We used 5.5.10. Press CTRL-N
to start a new compilation and choose CD ROM [Boot] from the left menu.
In the Boot tab, click the Image File radio button and use the Browse
button to find the Microsoft Corporation.img file in your XPdisc
folder. In the file browser, we had to choose All File from the bottom
drop-down menu to ensure that the IMG file was visible. Click Open.
Precision Burning
Your settings must be correct in Nero for the disc to boot properly. In
the same Boot tab, make sure the Enable Expert Settings checkbox is
selected and that No Emulation is chosen in the Kind Of Emulation
drop-down menu. By default, the Load Segment Of Sectors box should read
07C0. In the final box, Number Of Loaded Sectors, change the default 1
to 4. Now go to the ISO tab and make sure that the following options
are set using the checkboxes and radio buttons.
File/Directory name length: ISO Level 2
Format: Mode 1
Character Set: ISO 9660
Joliet: selected
Relax ISO Restrictions: all three boxes selected
You can use the Label tab to give your disc a unique volume label. Many
people use the original labels used for the various types of WinXP
installation discs. For example, WXHCCP_EN is the label for non-OEM
versions of WinXP Home. We've had no trouble making bootable slipstream
discs with custom labels. Click New.
Now you can highlight
and drag all of the files in your XPdisc folder into Nero's main file
window. Choose Write CD from the File menu to open the Write dialog
box. Click Write to make your copy. You should now have a bootable CD
that will load Windows XP with SP1 already integrated.
For
this to work, you need to have a PC whose BIOS lets you boot from a CD.
Also, because the bootable slipstream disc probably uses between 500MB
and 550MB of your disc, there is room to add a subdirectory of drivers
and utility programs you will want to reload onto your system when you
reinstall the OS. Finally, remember that making a bootable,
slipstreamed WinXP installation disc doesn't skirt the copy protection
that Microsoft has put in place. You will need to keep handy the
original disc and its product key number to enter at the beginning of
installation, and the activation process still does its check to see
that the OS is only being reinstalled to the same machine.
Thanks to both TheElderGeek.com and Windows-Help.net, whose respective
walkthroughs of this procedure we used as reference throughout. 
by Steve Smith
WinXP Tip Of The Month
Batch Renaming
If you use a digital camera, you probably have piles of images with
nondescriptive file names such as IMG_1.jpg. Rather than rename each of
these files individually, let WinXP help you quickly and easily rename
the whole batch at once. In the folder that contains the images you
want to rename, use the View menu to switch to Thumbnail or List mode.
Use the SHIFT key to help you select the group of files you want to
rename.
Now right-click the last file in the group and
choose Rename. Name the file something you want to use for the entire
sequence, such as Summer-trip.jpg. Now press ENTER, and the entire run
of files will be renamed in numbered sequence: Summertrip (1).jpg,
Summertrip (2).jpg, etc. The only glitch in this trick is that the last
file in the group will not have a parenthetical number, but you can
right-click that file easily enough to add the final number in the
sequence. |
Registry Tip
The New Window Trick
To avoid screen clutter, most of us set the Explorer Folder Options so
that double-clicking a folder opens its contents in the same window. In
some cases, however, opening a folder in a separate new window is
preferable; this Registry hack lets you add the option to your context
menu. In the Registry Editor, go to
HKEY_LOCAL_MACHINE\SOFTWARE\CLASSES\DIRECTORY\
SHELL and create a new key named Opennew. In the right pane, double-click Default and type Open New &Window
in the Value Data box. Back in the left pane, create a new key under
Opennew and name it Command. Set the new key's default value to
explorer %1, click OK, and close Regedit. This change requires a system
reboot to take effect; it adds an Open New Window command when you
right-click a folder. |
Infinite Loop: What's up, Doc?
According to NASA.gov, the recently discovered evidence of water in
Mars' Meridiani Planum region by Mars Exploration Rover Spirit lends
strong evidence to the theory that conditions on the planet may once
have been hospitable to life. This puts an interesting twist on earlier
images captured by Spirit's twin, Opportunity. NASA scientists
speculate that Opportunity's images, which resemble a rabbit, are
actually parts from the rover or its lander. In light of Spirit's
recent discoveries, however, it seems possible that images of a
loquacious black duck or a short humanoid resembling a Roman centurion
are forthcoming. |
|
Want
more information about a topic you found of interest while reading this
article? Type a word or phrase that identifies the topic and click
"Search" to find relevant articles from within our editorial database.
|
|
 Email This
